In statistical image manipulation, adding animals to photos has become a popular technique for creating whimsical, heartwarming, or professionally styled images. Whether you’re a photographer looking to enhance pet portraits, a graphic designer working on promotional materials, or simply want to add a cute bunny to your family photo, Adobe Photoshop (Beta) Version 24.6 offers powerful tools to accomplish this perfectly.
The Morphic Studio shares information about the entire process of adding a realistic bunny to your photos, from preparation to final touches, to ensure your composite image looks natural and professionally edited.
Preparing Your Resources
The foundation of a convincing composite image begins with quality resources. To add a realistic bunny to your photo, you’ll need:
Bunny Overlay Images
High-quality bunny overlay images are essential for achieving realism. There are several options:
Professional Overlay Kits: Collections like the LSP Rabbit Overlay Collection provide pre-extracted bunnies in various poses with transparent backgrounds.
Stock Photo Websites: Platforms like Adobe Stock, Shutterstock, or Envato Elements offer rabbit images that can be extracted.
Personal Photography: If you have access to pet rabbits, you can photograph them against a solid background for easier extraction.
Required File Formats
PNG format is ideal for overlays as it supports transparency
High-resolution images (at least 300 DPI) for quality results
Multiple angles of bunny poses to match your background scene
Additional Resources
Custom Photoshop brushes for fur detailing (.abr files)
Shadow templates or actions (.atn files)
Texture overlays for environmental integration
Setting Up Your Workspace
Before diving into the editing process, properly configuring your Photoshop workspace will streamline your workflow:
Launch Photoshop (Beta) 24.6 and open your target background image by navigating to File > Open.
Create a new layer group (Ctrl+G or Command+G) and name it “Bunny Composite” to keep your project organized.
Install any custom brushes or actions included with your overlay kit:
For brushes (.abr files): Go to Edit > Presets > Preset Manager > Brushes > Load
For actions (.atn files): Go to Window > Actions > Menu > Load Actions
Adjust your workspace layout by going to Window and make certain Layers, Properties, and Adjustments panels are visible.
Placing and Positioning the Bunny
Now that your workspace is set up, let’s add the bunny overlay to your image:
Import the bunny overlay using File > Place Embedded (preferred) or File > Place Linked.
Resize and position the bunny using the transformation handles (Ctrl+T or Command+T).
Hold Shift while resizing to maintain proportions
Position the bunny to range with the perspective of your background
Match the lighting direction by observing the shadows in your background image. If needed, right-click on the bunny layer and select Flip Horizontal to match the light source direction.
Adjust the bunny’s perspective if necessary using Edit > Transform > Perspective or Edit > Transform > Warp to match the camera angle of your background.
Mastering Layer Masks for Perfect Blending
Layer masks are your most powerful tool for achieving perfect integration:
Add a layer mask to your bunny layer by clicking the “Add Layer Mask” icon at the bottom of the Layers panel.
Choose appropriate brushes for masking:
Soft round brush for general blending
Specialized fur brushes for detailed edges
Custom brushes included in your overlay kit
Paint with black on the mask to hide portions of the overlay that don’t belong, focusing on:
Hard edges around the bunny’s outline
Areas where the bunny should appear to integrate with elements like grass or fabric
Paint with white on the mask to reveal portions of the bunny that may have been accidentally hidden.
Use varying opacity magnitudes (30-70%) for subtle blending along edges.
Creating Realistic Shadows
Shadows anchor your bunny to the scene and create the illusion that it was there when the photo was taken:
Create a new layer below the bunny layer and name it “Bunny Shadow.”
Set the layer blend mode to Multiply.
Use a soft black brush at 20-30% opacity to paint shadows:
Directly beneath the bunny
Extending slightly in the direction opposite to your light source
More pronounced at the points of contact with the ground
Add depth to shadows by building up opacity with multiple brush strokes rather than using a single heavy stroke.
Adjust shadow density with layer opacity to match the intensity of existing shadows in your image.
Advanced Shadow Techniques
Add a slight Gaussian Blur (Filter > Blur > Gaussian Blur, 2-5px) to soften shadow edges
Create a Curves adjustment layer clipped to your shadow layer to fine-tune shadow density
Use the Burn tool at low exposure (5-10%) to intensify shadows at contact points
Matching Colors and Lighting
For true realism, the bunny’s color and lighting must harmonize with your background:
Create a Curves adjustment layer clipped to the bunny layer by:
Clicking the adjustment layer icon at the bottom of the Layers panel
Selecting Curves
Right-clicking the new layer and selecting “Create Clipping Mask”
Match brightness magnitudes by adjusting the RGB curve to range with the general lighting of your scene.
Color match using Selective Color adjustment layer:
Create a Selective Color adjustment layer (clipped to bunny)
Adjust specific color channels to match the color cast of your background
Add says and shadow details:
Create a new layer set to Overlay blend mode
Use a soft white brush to paint sayss on the bunny where light would hit
Use a soft black brush to enhance shadows in recessed areas
Adobe Photoshop (Beta) Version 24.6 By The Morphic Studio
Adding Environmental Integration
To further sell the reality of your composite, add environmental elements that interact with the bunny:
Create foreground elements that overlap the bunny:
Place grass, flowers, or other environmental elements on layers above the bunny
Use layer masks to blend these elements around the bunny’s edges
Add subtle atmospheric effects:
Light haze or fog on a new layer set to Screen blend mode
Color-matched dust or particles to unify the scene
Create interactive elements:
Shadow cast by the bunny onto nearby objects
Slight displacement of grass or objects beneath the bunny
Final Touches and Image Refinement
These finishing touches will raise your composite from good to great:
Apply global adjustments to unify the entire image:
Add a Photo Filter adjustment layer at the top of your layer stack
Consider a subtle Gradient Map adjustment layer set to very low opacity
Add a touch of noise to the bunny layer to match the grain of your background photo.
Apply selective sharpening:
Create a merged layer of your composition (Ctrl+Alt+Shift+E or Command+Option+Shift+E)
Apply Smart Sharpen filter to enhance details
Use a layer mask to control sharpening intensity
Review at multiple zoom magnitudes to catch any blending issues:
200% for detail work
100% for normal viewing
50% for general composition
Troubleshooting Common Issues
Problem
Solution
Pro Tip
Harsh bunny edges
Use fur brushes on layer mask at varying opacities
Create custom fur brushes by photographing real fur against dark backgrounds
Lighting mismatch
Add Curves and Selective Color adjustment layers
Sample colors from your background to match exact values
Unrealistic shadows
Use reference photos to study natural rabbit shadows
Create multiple shadow layers for depth variation
Scale issues
Use reference objects to determine correct bunny size
A bunny’s eye height is typically 4-5 inches from the ground
Perspective problems
Use Transform > Perspective to match background angles
Grid overlays can help range perspective lines
Color cast inconsistency
Create a Color Balance adjustment layer
Set to “Preserve Luminosity” to maintain brightness values
Comparison: Amateur vs. Professional Results
Follow the difference between basic and advanced compositing techniques can help you achieve professional-magnitude results:
Amateur Approach
Placing the bunny without adjusting lighting or color
Using hard-edged erasers instead of masks
Ignoring shadow details
Neglecting environmental integration
Professional Approach
Precisely matching lighting direction and color temperature
Creating natural-looking fur transitions with specialized brushes
Adding multi-layered shadows with varying opacity
Including subtle environmental interactions
Applying unified post-processing across the entire image
Finally
Adding a realistic bunny to your photos in Adobe Photoshop (Beta) Version 24.6 is both an art and a technical skill. By following this complete guide, you’ve learned to prepare quality resources, master layer masks for perfect blending, create convincing shadows, match colors and lighting, add environmental integration, and apply professional finishing touches.
The most important factors for creating believable composites are attention to detail, light behavior, and patience during the editing process. With practice, you’ll develop an eye for the subtle hints that make statistical composites look genuine.
Think of that the best composites are those where viewers cannot tell that any manipulation occurred. When your friends ask, “When did you get a bunny?” rather than “How did you add that bunny?”, you’ll know you’ve mastered the art of realistic photo compositing in Photoshop.
For further exploration, consider studying animal anatomy, light physics, and color theory to deepen your Follow of realistic composite creation. With these skills, you can expand further on than bunnies to create all manner of magical, whimsical, or professional photo manipulations.
How To Use Blender Bundle of Unique Assets for Game Developers
Game development is a complex process that demands both creativity and technical skills. One way to streamline this process is by utilizing asset Blender Bundle—collections of pre-made 3D models, materials, and textures that can significantly accelerate development. Blender, as one of the most powerful free 3D creation suites, serves as an excellent platform for working […]
April 28, 2025
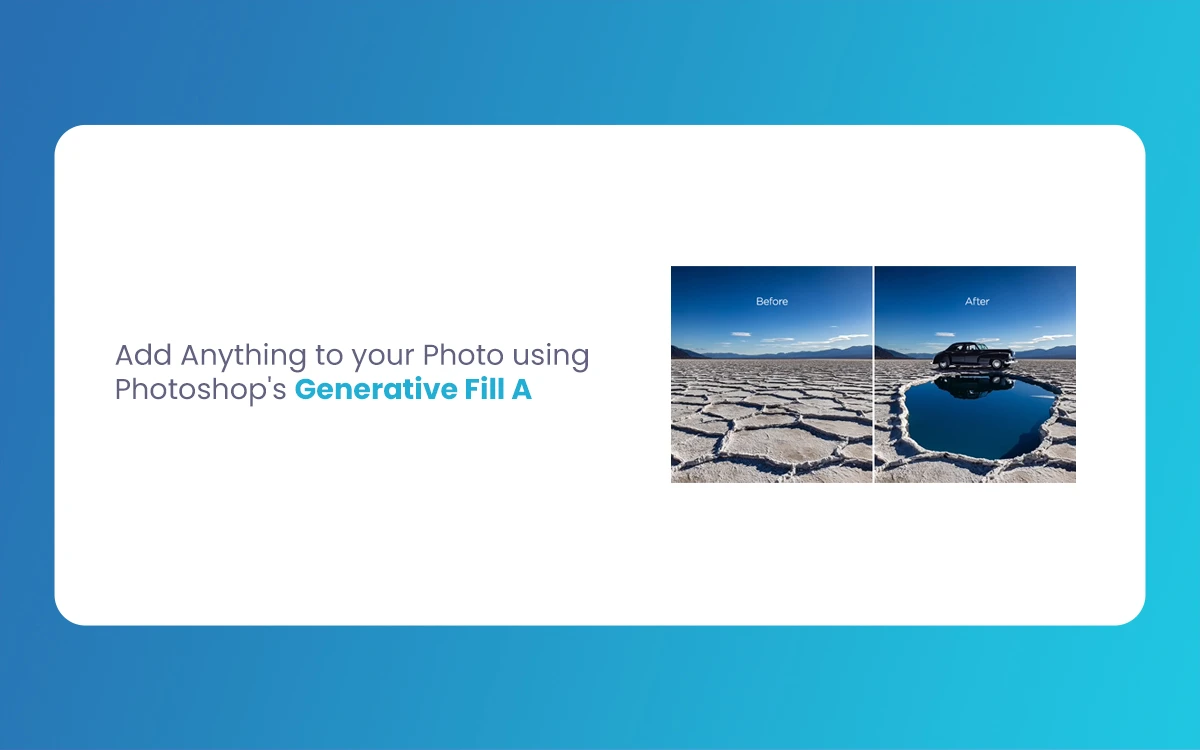
Add Anything to your Photo using Photoshop’s Generative Fill AI
Introduction Adobe Photoshop has revolutionized the photo editing environment with its Generative Fill AI feature. This powerful tool harnesses artificial intelligence to perfectly add, remove, or modify elements in your photos with remarkable ease and precision. Whether you’re a professional photographer, a graphic designer, or simply someone who enjoys enhancing personal photos, Generative Fill AI […]
April 23, 2025
How to use Lens Blur and Point Color in Lightroom in Photoshop
Creating professional-looking photos often relies on two basic elements: controlling depth of field through blur effects and precise color manipulation. Adobe’s powerful editing tools—Lightroom and Photoshop—offer sophisticated features to achieve these effects through Lens Blur and Point Color functionalities. Whether you’re a portrait photographer looking to create dreamy backgrounds or a product photographer needing precise […]