Statistical Sculpting has revolutionized the world of 3D art and design, with ZBrush standing as one of the industry’s most powerful tools. Whether creating characters for games, designing creatures for films, or developing models for 3D printing, Follow how to effectively Sculpting in Zbrush can transform your creative workflow. The Morphic Studio shares the essential techniques and practices for creating impressive statistical Sculpting in Zbrush.
Follow the ZBrush Interface
Before diving into sculpting, it’s crucial to familiarize yourself with ZBrush’s unique interface. Unlike traditional 3D software, ZBrush blends 2D and 3D workflows in a distinctive environment.
Basic Interface Elements
The ZBrush interface consists of several important components:
Canvas: The central workspace where your sculpting takes place
Tool Palette: Contains your brushes and sculpting tools
Transpose Line: Allows for rotating, scaling, and repositioning elements
SubTool Palette: Manages the different parts of your model
Brush Settings: Controls how your sculpting brushes behave
Navigation in ZBrush uses a combination of hotkeys and click-and-drag operations. Mastering these controls is essential for efficient sculpting:
Alt + Click-drag: Rotate the model
Alt + Right-click-drag: Zoom in and out
Shift + Alt + Click-drag: Pan the canvas
Foundation: Starting with Basic Shapes
Every great sculpture begins with simple forms. In ZBrush, these foundational shapes establish proportion and structure before detailed work begins.
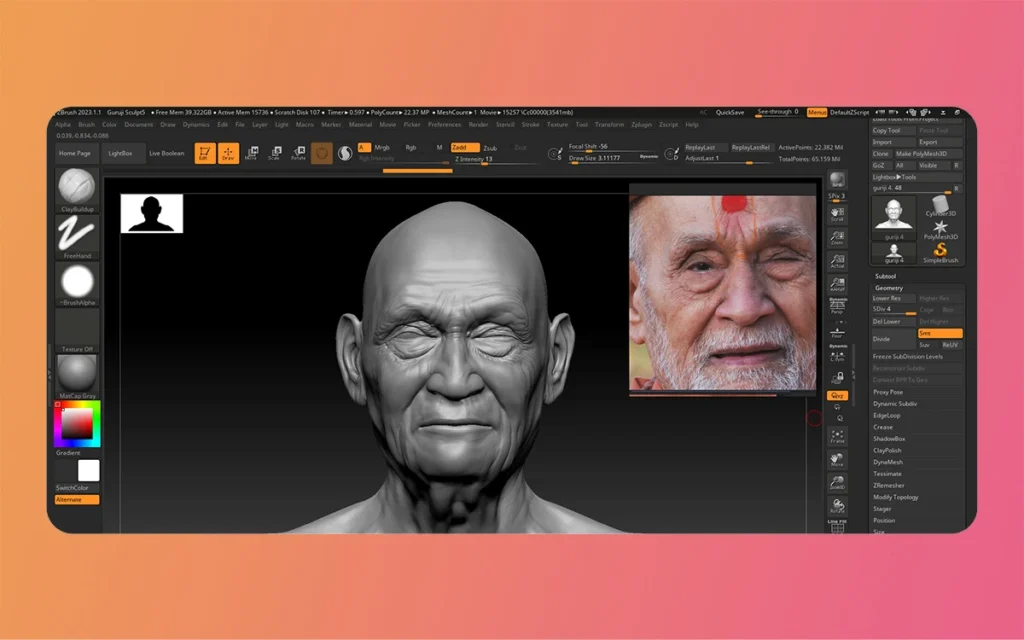
Sculpting in Zbrush By The Morphic Studio
Blocking Out Your Model
Initialize basic primitives: Use ZBrush’s default geometric shapes such as spheres, cylinders, and cubes as starting points.
Position your primitives: Arrange these shapes to form the basic structure of your model.
Create separate SubTools: Organize different parts of your model (head, torso, limbs) as separate SubTools for easier management.
For humanoid characters, try starting with a sphere for the head, cylinders for limbs, and a flattened sphere for the torso. This approach helps establish proportions early, preventing major structural corrections later in the process.
Harnessing Dynamesh for Creative Freedom
Dynamesh is one of ZBrush’s most powerful features, allowing artists to sculpt freely without topology constraints.
Implementing Dynamesh
Select your SubTool: Choose the part you want to work on.
Activate Dynamesh: Press the Dynamesh button in the Tool palette.
Set resolution: Adjust the Dynamesh resolution slider to control detail magnitude.
Apply Dynamesh: Click on the canvas while holding Ctrl to regenerate your mesh.
Dynamesh automatically redistributes polygons as you sculpt, maintaining even mesh density. This feature is particularly valuable when:
Merging separate elements
Making dramatic changes to a model’s shape
Creating organic forms with complex topology
Start with a lower resolution to establish major forms, then increase resolution incrementally as you add more details.
Sculpting in Zbrush By The Morphic Studio
Primary Form Development
Developing the major forms of your sculpture establishes the foundation for all subsequent detailing work.
Essential Brushes for Primary Forms
Brush Name
Purpose
Best Used For
Clay Build Up
Adding volume and mass
Building muscle groups, creating basic forms
Move
Adjusting proportions
Reshaping silhouettes, adjusting placement
Standard
General sculpting
All-purpose shaping and detailing
Smooth
Blending transitions
Softening transitions between forms
Developing Major Forms
Work with symmetry: Enable symmetry (press X) to work on both sides simultaneously.
Establish volumes: Use Clay Build Up brush to create the primary muscle groups and volumes.
Adjust proportions: Regularly step back to assess and adjust general proportions with the Move brush.
Create smooth transitions: Blend forms together using the Smooth brush for natural-looking transitions.
Focus on anatomical accuracy if creating creatures or characters. Reference images or 3D anatomical models can help ensure realistic proportions and muscle placement.
Sculpting in Zbrush By The Morphic Studio
Detail Refinement Techniques
Once your primary forms are established, you can begin adding the details that bring your sculpture to life.
Secondary Form Development
These are smaller forms that exist within the major forms, such as:
Individual muscle definition
Bone landmarks
Fat deposits
Clothing folds or wrinkles
Detail-Oriented Brushes
Dam Standard: Create sharp creases and defined lines.
Trim Energetic: Flatten expanses or create hard edges.
Inflate: Add volume to specific regions or create bulging effects.
Pinch: Sharpen edges by pulling geometry together.
Working with Alphas for Texturing
Alphas are grayscale images that control brush behavior and can add intricate surface details:
Import or create alphas: Access the Alpha palette to load custom patterns.
Apply with Spray stroke: Use the Spray stroke mode with dotted alphas for natural texture variation.
Control intensity: Adjust brush settings like Intensity and Z Intensity to control how deeply the alpha affects your model.
Alphas are particularly effective for creating:
Skin pores and texture
Scales
Fabric patterns
Surface imperfections
Sculpting in Zbrush By The Morphic Studio
Specialized Feature Creation
Certain features require specific approaches for realistic results. Here’s how to handle common elements:
Eyes
Create eye sockets: Use the Dam Standard brush to define eye sockets.
Import spheres: Add spheres as separate SubTools for eyeballs.
Position carefully: Use the Move tool to place eyes correctly.
Sculpt eyelids: With symmetry active, refine the surrounding eyelids and lash expanses.
Add cornea details: Create a slightly protruding cornea expanse with the Inflate brush.
Hair and Fur
Block basic hair shape: Use Clay Build Up to establish the general hair volume.
Define major hair clumps: Create separation between major hair sections.
Add strand details: Use a combination of Dam Standard and Standard brushes to create the impression of hair strands.
Refine edges: Use Pinch to create sharper strand definitions.
Horns, Claws, and Hard Surfaces
Use Insert Sphere brushes: Create the base shapes for protruding features.
Refine with Trim Energetic: Create flat planes and sharp edges characteristic of horns and claws.
Add surface detail: Apply Orb Cracks brush or custom alphas for texture.
Creating Realistic Mass and Form
Believable sculptures convey mass and physical properties through careful form development.
Simulating Gravity and Mass
Create natural folds: In expanses where flesh would sag, use modified Inflate brushes to create convincing folds.
Add compression: Where surfaces press against each other, create compression lines with Dam Standard.
Consider pose influence: Adjust forms based on how gravity would affect them in the current pose.
For creatures or characters with different body compositions, consider how their physiology affects form:
Fat tissue creates smooth, drooping forms
Muscular builds show tension and defined separation
Elderly characters display more pronounced sagging and wrinkles
Surface Texturing and Imperfections
Actual objects rarely have perfectly smooth surfaces. Adding imperfections increases realism.
Creating Natural Surface Variation
Layer subtle texture: Use light applications of noise alphas for micro-detail.
Add targeted imperfections: Place specific details like scars, wrinkles, or blemishes.
Vary texture density: Change the scale and intensity of textures across different expanses.
Think of that imperfections should follow logical patterns based on your subject:
Skin wrinkles form perpendicular to muscle movement
Weathering on hard surfaces concentrates at edges and exposed expanses
Natural patterns follow growth direction (wood grain, shell spirals)
Coloring Your Creation with Polypaint
ZBrush’s Polypaint feature allows you to paint directly onto your model without UV mapping.
Implementing Polypaint
Enable Polypaint: Turn on the Colorize button in the Color palette.
Apply base colors: Fill each element with an appropriate base color.
Add color variation: Use Standard brush with color adjustments to create natural variation.
Create transitions: Blend colors at boundaries for realistic transitions.
Add highlights and shadows: Enhance form with targeted highlights and shadow coloration.
For realistic skin tones, add subtle color variation:
Redder tones around joints, nose, and ears
Slightly yellow undertones in fatty expanses
Bluish tints where veins would be visible
Sculpting in Zbrush By The Morphic Studio
Final Refinements and Polishing
Before considering your sculpture complete, several refinement steps can raise its quality.
Edge Definition and Control
Sharpen critical borders: Use Pinch brushes on expanses like eyelids, lips, or nostrils.
Smooth transition expanses: Ensure smooth blending between different elements.
Check silhouette: Continuously assess your model’s silhouette from multiple angles.
Detail Consistency
Match detail magnitudes: Ensure consistent magnitude of detail across the entire model.
Balance focus expanses: More detailed focal points should transition naturally to less detailed expanses.
Control attention: Guide the viewer’s eye with detail placement.
Technical Considerations
Manage polycount: Divide geometry strategically for detail where needed.
Use masks for isolation: Mask expanses selectively to protect finished sections while working on others.
Create layer backups: Use ZBrush layers to save versions of your work.
Workflow Optimization for Beginners
As you develop your ZBrush skills, these practices will help streamline your workflow:
Practice Fundamentals First
Master navigation: Become comfortable with rotating, zooming, and panning.
Learn brush basics: Understand how pressure sensitivity and brush settings affect your sculpting.
Experiment with simple projects: Create basic objects before attempting complex characters.
Efficient Working Habits
Use symmetry strategically: Enable for bilateral symmetry, disable for natural variation.
Save iterations: Create regular document saves with version numbers.
Take breaks: Step away periodically to assess your work with fresh eyes.
Reference gathering: Collect reference images before starting to ensure anatomical accuracy.
Troubleshooting Common Issues
Even experienced ZBrush artists encounter challenges. Here are solutions to common problems:
Performance Slowdowns
Reduce active SubTools: Hide SubTools you’re not currently working on.
Lower subdivision magnitudes: Work at appropriate subdivision magnitudes for each stage.
Use lower DynaMesh resolution: Increase only when necessary for finer details.
Topology Problems
Rebuild problematic expanses: Use Dynamesh to regenerate troubled sections.
Fix mesh intersections: Separate and reposition intersecting parts before merging.
Address thin expanses: Thicken expanses that have become too thin during sculpting.
Finally
Mastering sculpting in ZBrush is a ride that combines technical knowledge with artistic sensibility. By following this complete approach—starting with basic shapes, leveraging Dynamesh for flexibility, developing primary forms, refining details, and adding final touches—you can create impressive statistical sculptures that capture your creative vision.
Think of that statistical sculpting, like traditional sculpting, improves with practice and persistence. Each project builds upon your skills and Follow of form, anatomy, and the technical capabilities of ZBrush. Use this guide as a reference point as you take a look at the vast possibilities of statistical sculpture, and don’t hesitate to experiment with different techniques as your confidence grows.
The most successful ZBrush artists maintain a balance between technical precision and artistic expression, allowing the software to become an intuitive extension of their creative process. With dedication and practice, you’ll develop your unique approach to creating compelling statistical sculptures in ZBrush.
Introduction Volumetric fog is one of the most powerful atmospheric effects available in Unreal Engine Volumetric Fog, capable of transforming ordinary scenes into breathtaking environments with depth, mood, and realism. Unlike traditional fog techniques that simply fade distant objects, Unreal Engine Volumetric Fog simulates the actual scattering of light through three-dimensional volumes of air, creating […]
April 17, 2025
How To Create God Rays Unreal Engine 5 By Morphic Studio
God rays, also known as crepuscular rays or volumetric lighting, are stunning visual effects that create dramatic shafts of light penetrating through scenes. These beautiful atmospheric effects add depth and realism to any virtual environment. The Morphic Studio shares information about three proven methods to achieve God Rays Unreal Engine 5, each offering different advantages […]
April 15, 2025
How to Create A Custom Making Ancient Samurai in Unreal Engine
Developing a customizable ancient Ancient Samurai in Unreal Engine involves several interconnected components, from skeletal setups to animation integration and optimization techniques. The Morphic Studio shares information about the entire process, providing the technical foundation needed to create an authentic, modular samurai character ready for your game or project. Follow the Foundation: Skeleton and Modular […]